iOS - MRDC Camera Module
The MRDCCameraModule interface provides capability to a module to present custom
Mobile Remote Deposit Capture (MRDC) Camera functionality. Implementing module can
provide their own camera view UI for capturing check images as part of Deposit check
functionality within online banking.
This module provides control over the camera presentation and image capture process
for Mobile Remote Deposit Capture functionality which user can access via
Menu > Transactions > Deposit Check from side menu.
The SDK now supports explicit MRDC camera selection through MRDCCameraSelection and the
ModuleDelegate.takeRemoteDepositPicture(_:cameraSelection:) overload.
Implementation
Implementing an MRDCCameraModule requires creating a custom camera controller and
handling the capture delegate methods. The module should provide a camera view
controller and manages the presentation lifecycle.
If you are inheriting from Q2ModuleBase, it provides a default implementation of
MRDCCameraModule. You need to override the methods specified in the
MRDCCameraModule protocol to provide your custom functionality.
import UIKit

class CustomMRDCCameraModule: MRDCCameraModule {

    func remoteDepositCameraController(withDelegate delegate: MRDCCaptureImageControllerDelegate) -> UIViewController? {
        let cameraController = CustomCameraViewController()
        cameraController.captureDelegate = delegate
        return cameraController
    }

    func didFinishPresentingRemoteDepositCamera() {
        // Handle cleanup after camera dismissal
        print("MRDC camera presentation finished")
    }
}

class CustomCameraViewController: UIViewController {
    weak var captureDelegate: MRDCCaptureImageControllerDelegate?

    override func viewDidLoad() {
        super.viewDidLoad()
        setupCameraInterface()
    }

    private func captureImage() {
        // Implement image capture logic
        let capturedImage = UIImage() // Your captured image
        let dataPackage = NSData() // Additional image data

        captureDelegate?.didCaptureImage(image: capturedImage, dataPackage: dataPackage)
    }
}
MRDCCaptureImageControllerDelegate
The delegate provides methods to control the capture process and handle captured images:
Required Methods
shouldCaptureSide() -> MRDCCheckSide- Determines which side of the check to captureshouldCloseCapture() -> Bool- Controls whether the camera should closedidCaptureImage(image: UIImage?, dataPackage: NSData?)- Handles successful image capturedidCompleteImageCapture()- Notifies completion of the capture processdidCancelImageCapture()- Handles user cancellationdidFailImageCapture(error: NSError)- Handles capture failures
Implementation Example
extension CustomCameraViewController: MRDCCaptureImageControllerDelegate {

    func shouldCaptureSide() -> MRDCCheckSide {
        // Return the appropriate check side to capture
        return .front
    }

    func shouldCloseCapture() -> Bool {
        // Determine if capture should close
        return true
    }

    func didCaptureImage(image: UIImage?, dataPackage: NSData?) {
        // Process the captured image and data
        guard let image = image else { return }
        // Handle the captured image
    }

    func didCompleteImageCapture() {
        // Handle completion
        dismiss(animated: true)
    }

    func didCancelImageCapture() {
        // Handle cancellation
        dismiss(animated: true)
    }

    func didFailImageCapture(error: NSError) {
        // Handle capture failure
        print("Image capture failed: \(error.localizedDescription)")
    }
}
How to Test
Camera Selection
Starting in 26.3.0, module developers can explicitly request which MRDC capture flow to
use when invoking remote deposit capture through ModuleDelegate.
Available Options
MRDCCameraSelection.q2CameraRequests the Q2 camera module flow.MRDCCameraSelection.defaultCameraUses the existing default capture behavior.
Example
let responses = try await moduleDelegate?.takeRemoteDepositPicture(
    .front,
    cameraSelection: .q2Camera
)
Use this overload when your module needs to opt into a specific MRDC camera experience instead of relying on the default capture path.
If you do not need explicit camera selection, you can continue using the existing API:
let responses = try await moduleDelegate?.takeRemoteDepositPicture(.front)
Both APIs return [RDCResponse].
Additional Configuration
The additionalConfig parameter is available starting in 26.5.0.
Starting in 26.5.0, you can pass additional configuration to the MRDC camera module
using the additionalConfig parameter. This allows forwarding runtime values such as a
third-party license key to the camera module.
Example
let responses = try await moduleDelegate?.takeRemoteDepositPicture(
    .front,
    cameraSelection: .q2Camera,
    additionalConfig: ["licenseKey": myLicenseKey]
)
The additionalConfig dictionary is passed through to the camera module's
MRDCCameraModuleContext as runtime parameters. The camera module can access these
values from ModuleInvocationData.runtimeParameters.
If you do not need to pass additional configuration, use nil or one of the existing
overloads without this parameter.
Prerequisites
Your settings.json file should include a NativeMRDCModule entry with identifier
rdc which will be responsible for presenting UI to initiate mobile deposit check
flow.
{
  "targetURLBase": "",
  "targetPageName": "uux.aspx",
  "enableDevMode": true,
  "nativeMenu": true,
  "modules": [
    {
      "name": "MyMRDCCameraModule",
      "packageName": "module-package-name",
      "productName": "ModuleProductName",
      "className": "ModuleClassModule",
      "identifier": "com.q2.mobile.module.{MyMRDCCameraModule}", // your identifier
      "data": "",
      "enabled": true
    },
    {
      "name": "NativeMRDC",
      "packageName": "Q2MobileCore",
      "className": "NativeMRDCModule",
      "identifier": "rdc", // important
      "data": "",
      "enabled": true
    }
  ]
}
Steps
- Login
- Tap on Menu
- Transactions > Deposit Check
Following UI would be presented.
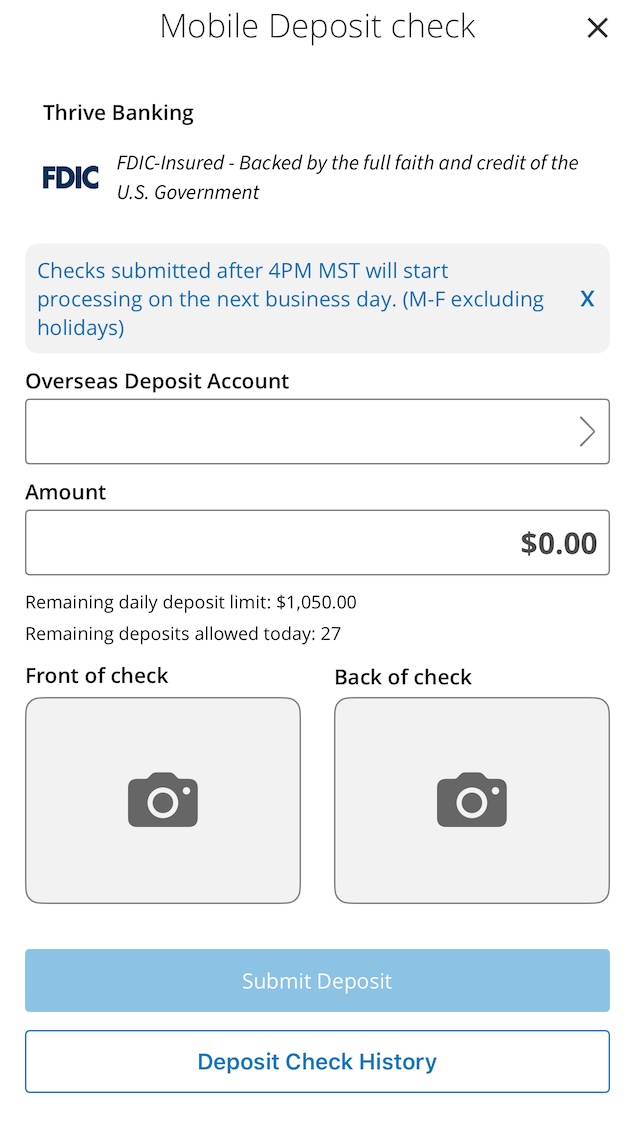
- Select account under
Ovserseas Deposit Account - Enter value in
Amountfield. - Tap on
Front of checkorBack of check
Q2MobileCore will now request UI from your module and present it to the user.
Platform Availability
This module is not available on watchOS.